Showing posts with label nail art. Show all posts

Sunday, 8 December 2013

29th Birthday :)


Hi Guys!

It was my birthday the other week - I am now 29 years old.

As normal I took the week off work and I had a great time - thanks to my family and friends for making my birthday week a great week :)

Here are a few pics of what my week was like:

I went to Ping Pong with my mum, brother and Cee. Lazy sumday (all you can eat dim sum) is my favourite day.
We had over 40 kegs of dim sum. It was a good day. 

I'm learning to use all those photo editing/filtering apps. My fav dish of the day was the black prawn dim sum (top right). Traditionally I love Hau Gau. Prawn allergy? Kiss my arse!

Received a nail art book. I love it cos I love nails but also because it looks really nice displayed. Blogger problems.

Hmmmm This isn't a very appetising looking dish but it's a close up of dry beef ho fun - noodles for a long life. 
More birthday food. I love mixed grills.
Day 1 of my birthday advent calendar!!! Thank you V for my leopard print tangle teezer :) 

New shoes from NK - thank you :)

I ate much more and got some other lovely stuff but no more pics.

I cannot believe that I will be 30 years old next year. I still feel young. 

Sunday, 27 October 2013

Halloween: Bloody eyeballs nail of the day

Hello Ghouls andGuys! Happy Halloween!

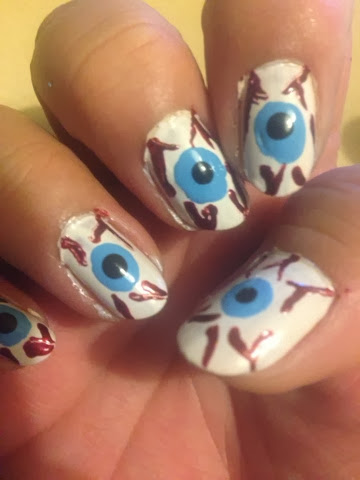
I wanted to do a spider bun to celebrate theghost and  ghoul season but due to hair cut and colour it just wasn't working out (it would have been a baby blonde spider). Instead  - I decided that some scary bloody eyeballs would satisfy my thirst for blood. Are you scared? If you want to have some scary nails keep on reading!
To get this gruesome look you need 4 colours: white, red, blue and black. And I also used a clear base and top coat. I used my dotting tools to help me out but nail art pens or a toothpick would also work. This is super easy and quick.
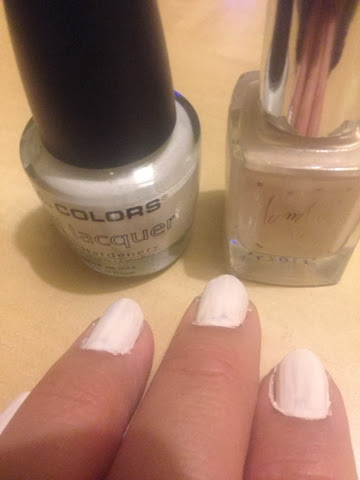
Step 1: Paint all your nails in an opaque white.
(I actually used a cream colour with a white on top to get a nice even colour.) 

Step 2: Make blue dots in the middle of each nail
(Of course you could have a different coloured eye - but I'd recommend blue or green for more of a visual impact)
Step 3: Make black dots in the centre of the blue dots
Step 4: Make messy red lines from the outside in. These are the bloody veins.
(I found this really hard but I think the overall look works ok?)
Step 5: Make small white dots off of the black dots

And that's it! Easy peasy!

Do you do anything halloween? Some scary nails? Full out fancy dress?
Happy Halloween ghouls and guys xoxo

Sunday, 21 August 2011

NOTD: tie dye slash acid wash nails

Hey Guys!

Sorry about the claw hand pose lol

A nail of the day fresh off the press :)

It's supposed to be a acid wash/tie dye effect nail and was really easy to do and no special tools or polish needed.

"Recipe"

2 nail colours

Base and top coat (optional)

Cotton buds

Nail polish remover

Step One [ABOVE pic]:

Paint your nails with the darker polish (mine are painted in collection 2000 in ebony). Let them dry completely

Step Two [BELOW pic]:

Paint completely over your nails in the lighter polish (mine colour of choice was boots no7 in the limited 60's mini skirt). Let them dry completely

Step Three [BELOW pic]:

Now comes the fun bit. This was my first time and I was a bit inpatient but I think second time round it will look nicer, but anyway...

Get your cotton bud and dip it into nail polish remover (you want it totally saturated but not dripping wet) and then just GENTLY rub it over your nail until you get the desired effect (as you rub the top polish colour, the bottom polish colour is exposed).

Sunday, 14 August 2011

Goldfingers

Hi Guys!

Just wanted to share with you my NOTD from last week:

And this is how I did it...

Firstly I purchased some glitter dust from ebay for around the £2.00 mark. I probably didn't get the best deal on ebay but definitely cheaper than buying it on the high street so I am happy.

The glitter was gorgeous - really really finely milled and sparkly.

So all I did was paint my nails with clear polish (you can choose whatever base colour you want - I think I'll do black next time to make the glitter pop) and let it dry.

Once the whole nail was dry (I did 2 coats) I then painted the tips of my nail in clear and then dipped my nail into the glitter pot.

Blew/shook off the excess glitter and after a few minutes, put on another coat of clear polish to seal the glitter.

Ta dah!

*If you decide to give this ago don't forget to lay down some newspaper on surfaces. And probably best to wear loungey clohthes so that you don't get your outift covered in glitter.

*And yeah I know I could have just painted my tips with glitter polish or wore falsies but I enjoy this sort of stuff and find it theraputic.

*One last thing!! This look only lasted a day....or not even a whole day to be honest. But it wasn't the glitter or technique. It was my cheap arse clear polish. All those layers PEELED straight off! By the end of the day I'd peeled off all my polish and I didn't even need to use polish remover when I got home. Oh well!

Wednesday, 18 May 2011

NOTD

Hi Guys,

Just a very simple NOTD. Nude basecoat (ELF) and then a quick slick of my new toy - black nail art polish.

I know it's beyond lame and boring but hey, I'm just starting out and you have to start somewhere right!!

Maybe soon I will graduate to two lines and maybe even some dots :)

Related Posts with Thumbnails